|
This tutorial was inspired by a troubleshooting question from my local Barony. The Barony has email accounts setup, via G Suite, under "ayreton.org". They are currently in the process of transitioning to the Middle Kingdom email accounts, also powered by G Suite. The question was "Is there a way to automate this from one account to another?" The simple answer is "Yes", but the process wasn't that simple. One email account can import the data of another email account, though the tutorials provided online didn't quite work for me when executed. After some trial and error, I have found an effective procedure that worked for our particular situation. I hope it will assist you too! Email Import TutorialSign into the source account (the email address you wish to import the data from). Go to "Settings" (gear shaped button near the top, right-hand corner). Click on "Settings" in drop-down menu.  Once in "Settings", go to "Accounts and Import". Click on "Forwarding and POP/IMAP". In the "POP download" section, select "Enable POP for all mail". Also make sure that, in section #2, the option to "keep mail copy in the inbox" is selected. This is just a precaution in case something goes wrong in the transfer, you will still have a copy of the emails left on the original account. Once those options are selected, scroll down and click "Save Changes". 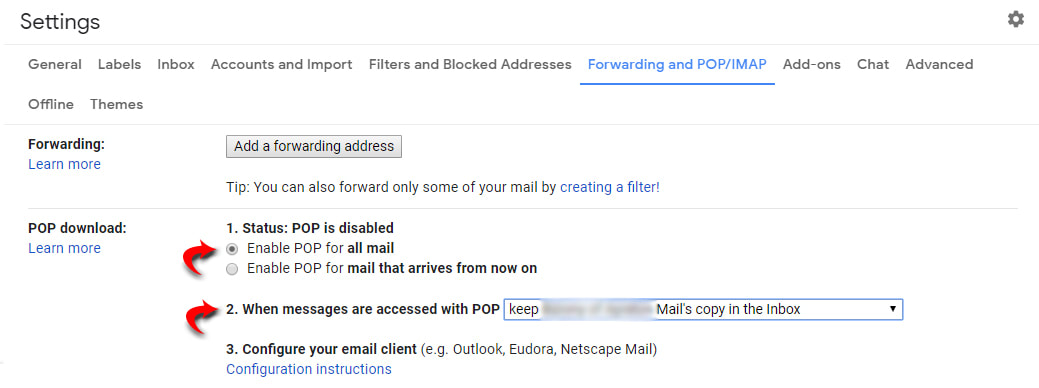 The next step seems to be the crucial missing piece in many of the other tutorials that I have tried. Without doing this first, I continued to receive an error message while attempting to move forward with the standard import process. In the top right-hand corner of the screen, click on your google account icon. Then click "Google Account" button. This should take you to a new screen. On the left side of the screen, select "Security" button. On the "Security" screen, scroll down until you find the "Less secure app access" section. If this option is not turned on, select "Turn on access (not recommended)"  This will take you to a new screen. Click the toggle button to turn on this feature. 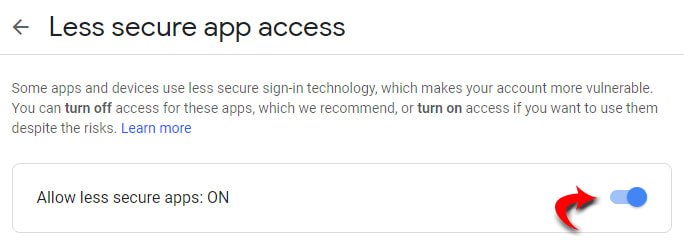 Once this is turned on, you can sign out of the source account. Now sign into your new account, where you want the information to be imported to. Click on the gear button, and select "Settings" in the drop down box. Once in settings, go to "Accounts and Import". Select the link named "Import mail and contacts". 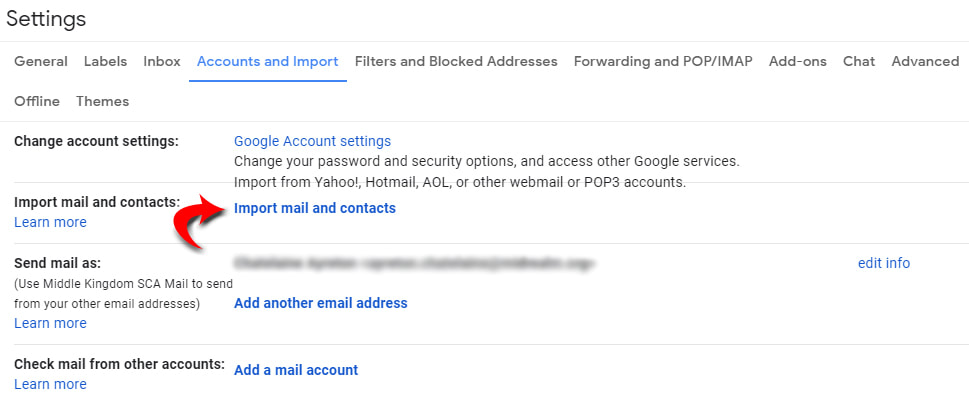 This will open a pop-up window. Here you will type in the initial source email address. Click "Continue". 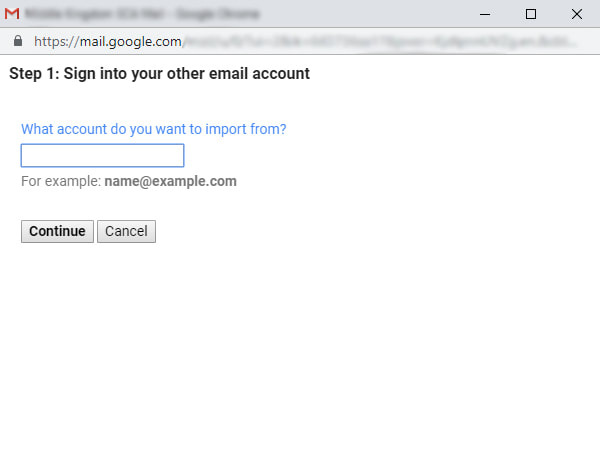 On the following screen you will enter the password for the source email account. The "POP username" and "POP server" may have auto-filled information, but make sure the information is the following: POP username: the full email address for the source account [example: [email protected]] POP server: pop.gmail.com Port: 995 Make sure box is checked for "Use SSL" Once that is all filled out, select "Continue". 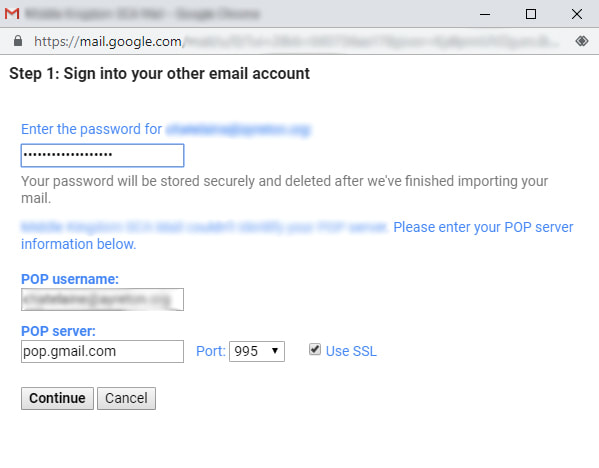 On the following page, make sure only two boxes are checked. #1 "Import mail" and #4 "Add label to all imported mail". #4 is optional. This is only if you would like the imported mail to have a label attached to it, in order to differentiate from existing mail in the new email inbox. Select "Start import" when finished. NOTE: If you were to select option #2, this will prevent the import process from working. In a previous step, within the source account's settings, we already chose to keep a copy of emails on the server. So to also request the same action in this step causes a malfunction. 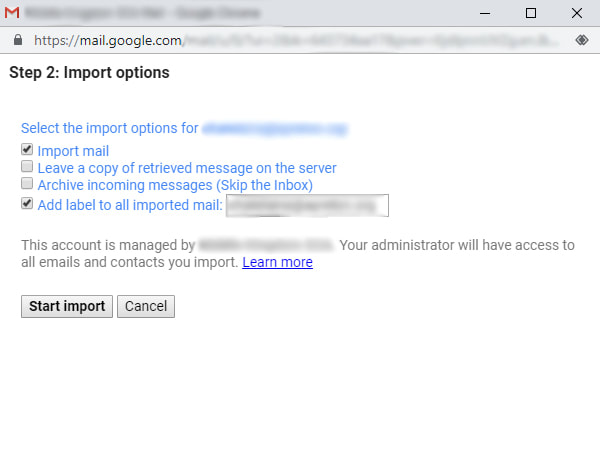 On the following page, make sure only two boxes are checked. #1 "Import mail" and #4 "Add label to all imported mail". #4 is optional. This is only if you would like the imported mail to have a label attached to it, in order to differentiate from existing mail in the new email inbox. Select "Start import" when finished. NOTE: If you were to select option #2, this will prevent the import process from working. In a previous step, within the source account's settings, we already chose to keep a copy of emails on the server. So to also request the same action in this step causes a malfunction.  If steps were completed correctly, you will be taken to the next page. Select okay, after reading the closing instruction, and the pop-up window will close. 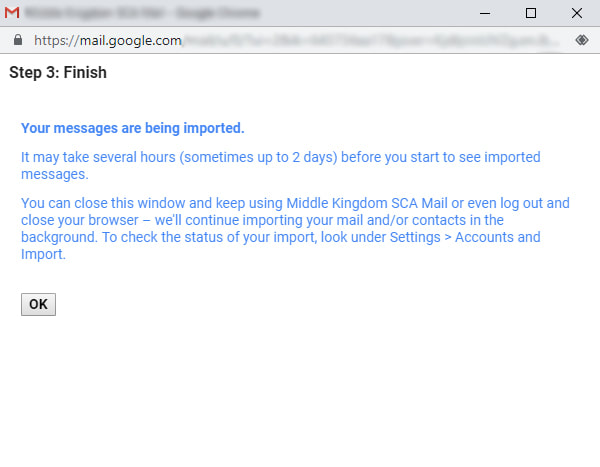 As the closing instructions mention - it may take a few moments, hours or days before messages begin importing. My personal experience, import began within fifteen minutes. Depending on how many emails need to be imported will determine how much time it will take before the import is complete. You can check the current status of the import by going to the new email account's "Settings", under "Accounts and Import" sections. In the row labeled "Check mail from other accounts:" you should see the source email address listed, along with the current status. 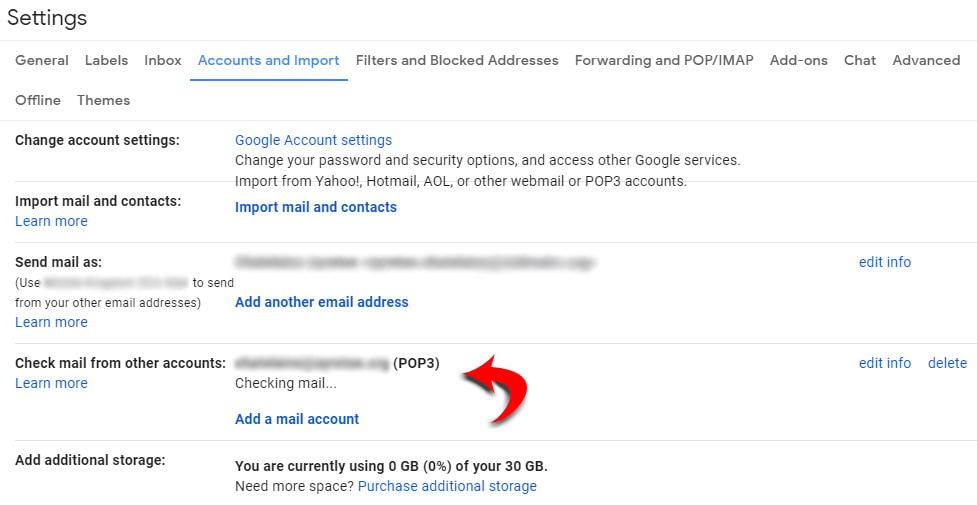 Once the import is finished, you can remove the source email from the "Check mail from other accounts:" list. If the source email is not going to be deactivated/deleted, I suggest going back into the account settings and turning the "Less secure app access" back off.
0 Comments
Your comment will be posted after it is approved.
Leave a Reply. |
